How to Setup SuperRack LiveBox with DiGiCo Consoles with Remote Control
To setup SuperRack LiveBox D or LiveBox M with DiGiCo consoles with remote control, follow the steps below:
Let’s start with a list of all hardware, software and peripherals you will need to set this up:
- One DiGiCo SD or Quantum console, equipped with a Dante I/O card, running DiGiCo SD / Quantum software v1742 and above.
- SuperRack LiveBox (running SuperRack Performer host software) and basic peripherals – monitor, keyboard, mouse.
- A USB Flash Drive for Waves licenses (optional).
- One CAT5e/CAT6 cable (LiveBox M) or at least two CAT5e/CAT6 cables (LiveBox D).
- Two 75-Ohm BNC cables or one bi-directional fiber cable (LiveBox M only).
The Waves LiveBox comes pre-installed with all Waves plugins*.
First, activate your SuperRack Performer & Waves plugin licenses:
- Register your LiveBox serial. Once registered, your SuperRack Performer and Live bundle licenses will be deposited into your account.
- In Waves Central, go to the ‘Licenses’ tab, and select ‘Not Activated’.
- Select the licenses for SuperRack Performer and your plugins and/or bundles.
- On the right panel, select the Target Device for Licenses. Either the computer or a USB flash drive.
- Click on Activate.
*New Waves plugins released after the initial release of LiveBox can be installed separately via Waves Central.
To install new Waves plugins:
- Launch Waves Central and login to your Waves account.
- On the ‘Install Products’ page, select the plugins you wish to install.
- Click "Install".
For non-waves VST3 installation and activation, follow the instructions of your selected vendors.
LiveBox D
- Connect the LiveBox Dante port and your DiGiCo console’s Dante I/O to your Dante switch using CAT5e/CAT6 cables. The PCIe LED in the back of the LiveBox should turn solid green once the connection is established.
- Create the required connections between your DiGiCo console Dante I/O and the LiveBox Dante I/O using Dante Controller/DDM. This can be done using Dante controller on the LiveBox, however it requires a separate network connection to the Dante switch.
- Connect a CAT5e/CAT6 cable between your DiGiCo console network port/switch to the LiveBox network port, or to a USB>Ethernet adapter, if your network port Is already occupied.
LiveBox M
- Connect MADI cables from your DiGiCo console to the back of your LiveBox M.
- Connect a CAT5e/CAT6 cable between your DiGiCo console network port/switch to the LiveBox network port, or to a USB>Ethernet adapter, if your network port Is already occupied.
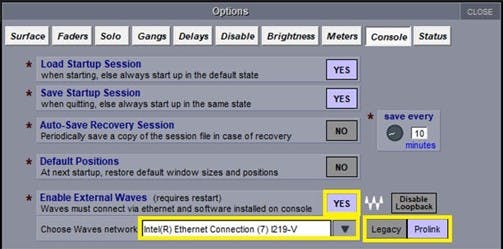
- On your DiGiCo, go to Options > Console
- Make sure Enable External Waves is set to Yes and that the console network port is selected.
- The default selected mode is Legacy, which is not supported with LiveBox. Click on ProLink and power cycle the console.
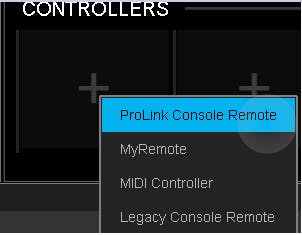
- Launch SuperRack Performer.
- In the Controllers pane, add ProLink Console Remote.
- Select the correct network port manually. The console should appear in the list.
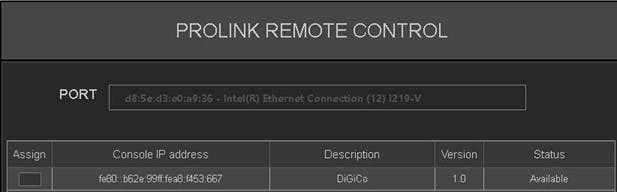
- Checkmark ‘Assign’ – status will change to ‘Connected’.

- A session load command will pass from the console to SuperRack. If there is no matching session in SuperRack’s integrated sessions folder, SuperRack will load an empty session.
SuperRack Performer Integrated session folder location:- C:\Users\Public\Waves Audio\SuperRack Performer\Integrated Sessions
- Session/Snapshots sync: Loading a session on the DiGiCo console prompts loading the corresponding session in SuperRack Performer. Same goes for snapshots. Firing a snapshot on the console recalls the corresponding snapshot in the SuperRack Performer session.
- Touch & Turn control: This function allows you to control selected plugin parameters using the DiGiCo console. Control applies to one plugin at a time.
- Sync to console global tempo: This function allows time-based Waves plugins to sync to the console’s global tempo and tempo changes in snapshots.
- Unattended/Live lock: When locking the console in unattended mode, SuperRack surface locks as well.
ProLink features available only in SuperRack SoundGrid:
- PFL/Solo function (solo display insert/output)
Need any assistance? Contact our Technical Support team.

Life is sweeter
with cookies...
We use cookies to give the best
possible experience when using our website